
If you're a Steampunk (or costumer of any variety) and you don't know what Rub 'n Buff is, this tutorial will make your life so much easier. You have no idea.
So, what is Rub 'n Buff? Well, it's a product made of wax and very, very fine metal grit. You can rub it on any smooth surface, and that surface will then look like metal. It's a miracle product, and no Steampunk should be without it. This is what it looks like:
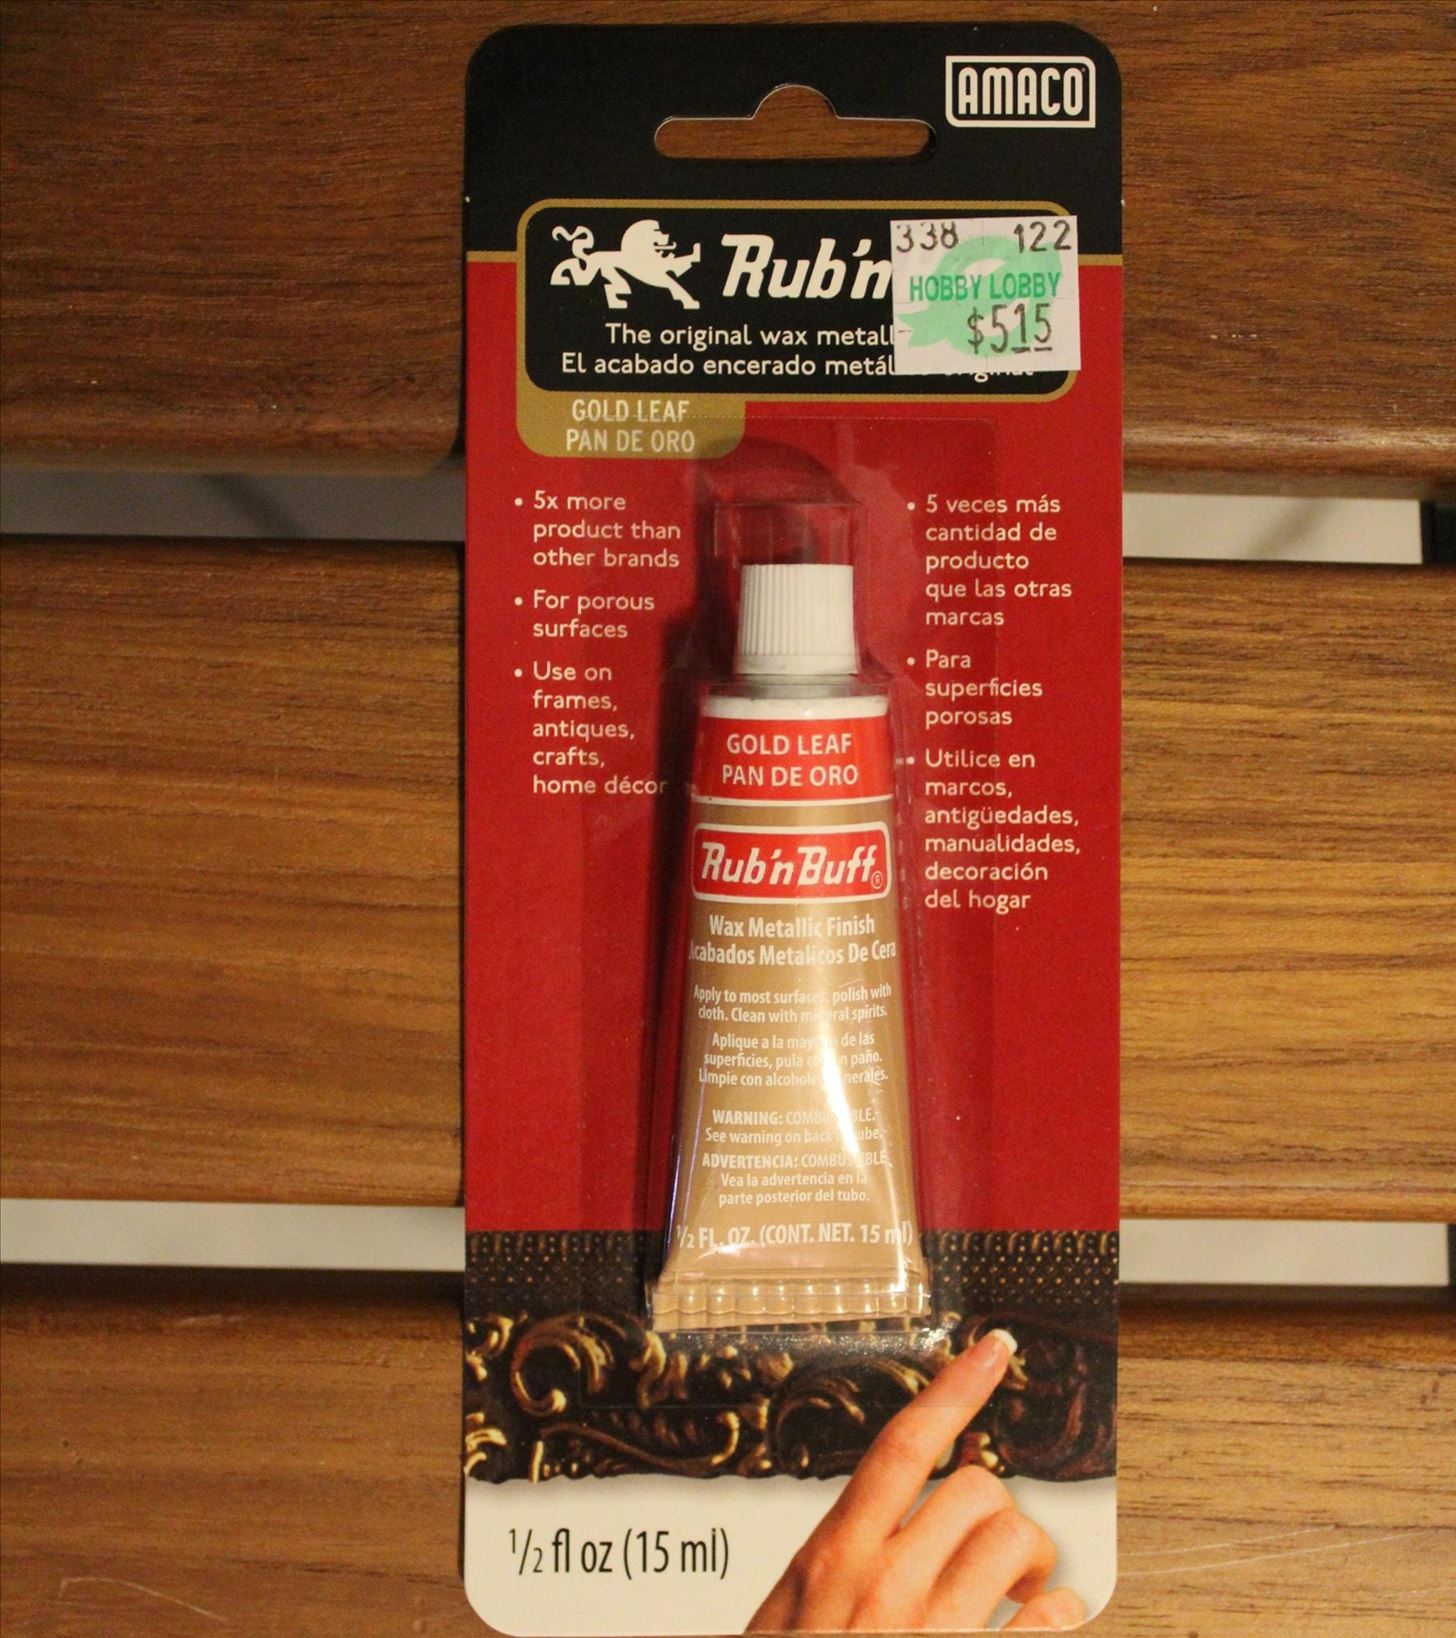
As you can see, it comes in a tube, and I paid $5.15 for it. This particular color is Gold Leaf, and one tube of Rub 'n Buff is supposed to be able to cover an area of 20 square feet, which is far more than you would use on any prop that I can imagine.
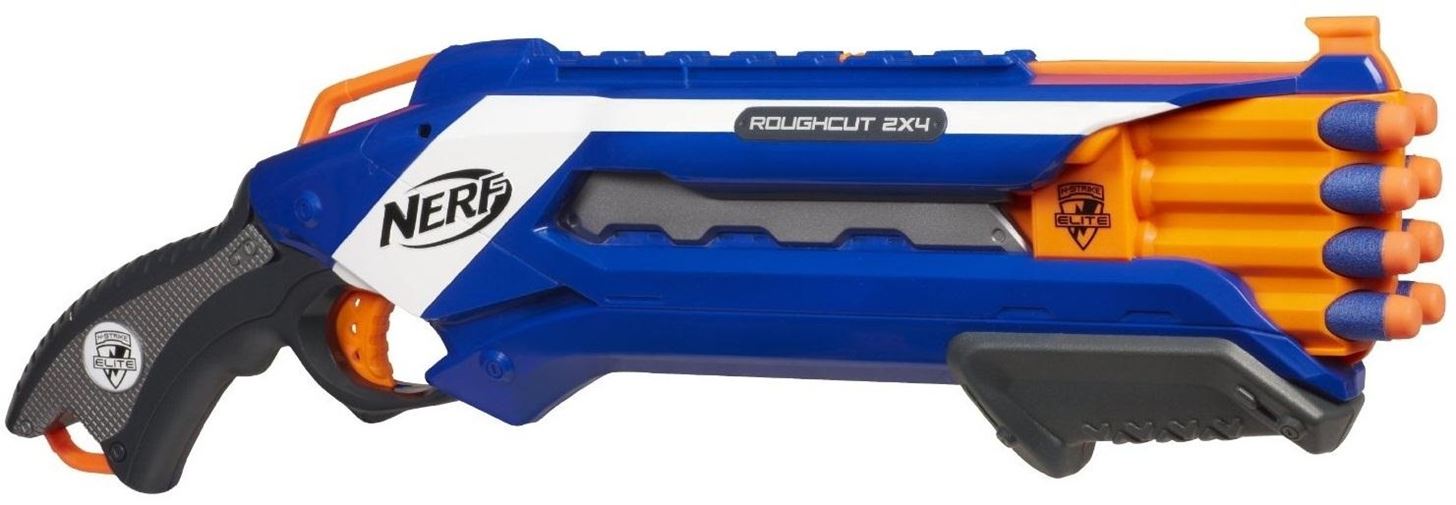
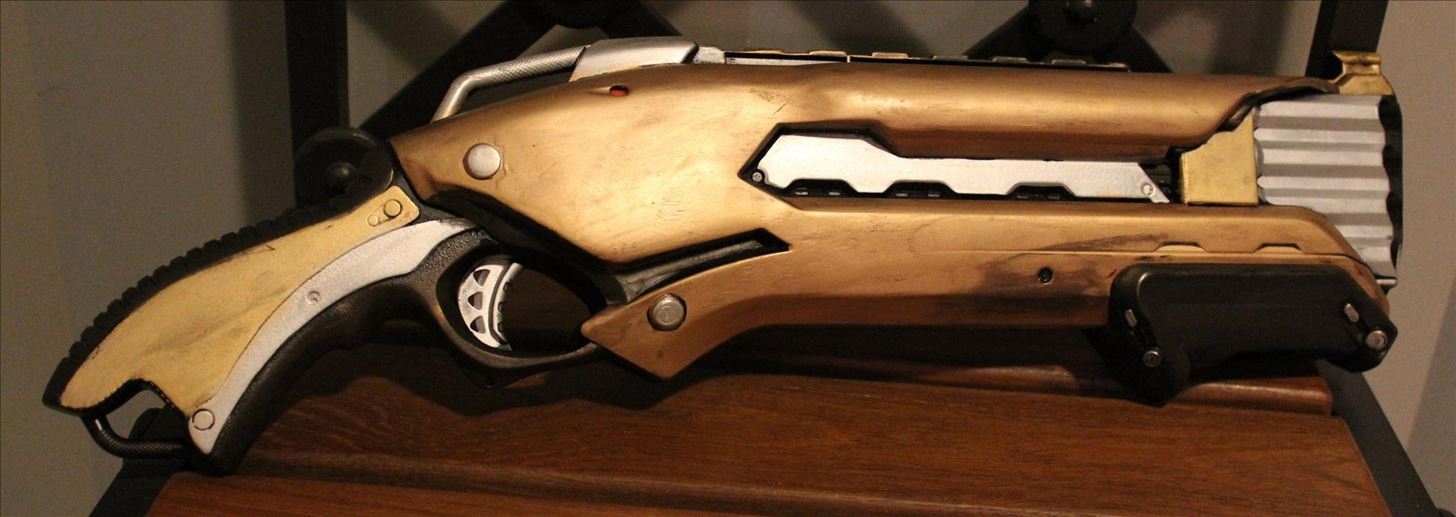
For this project, I'll be using it on a Nerf Rough Cut, which originally looks like this:
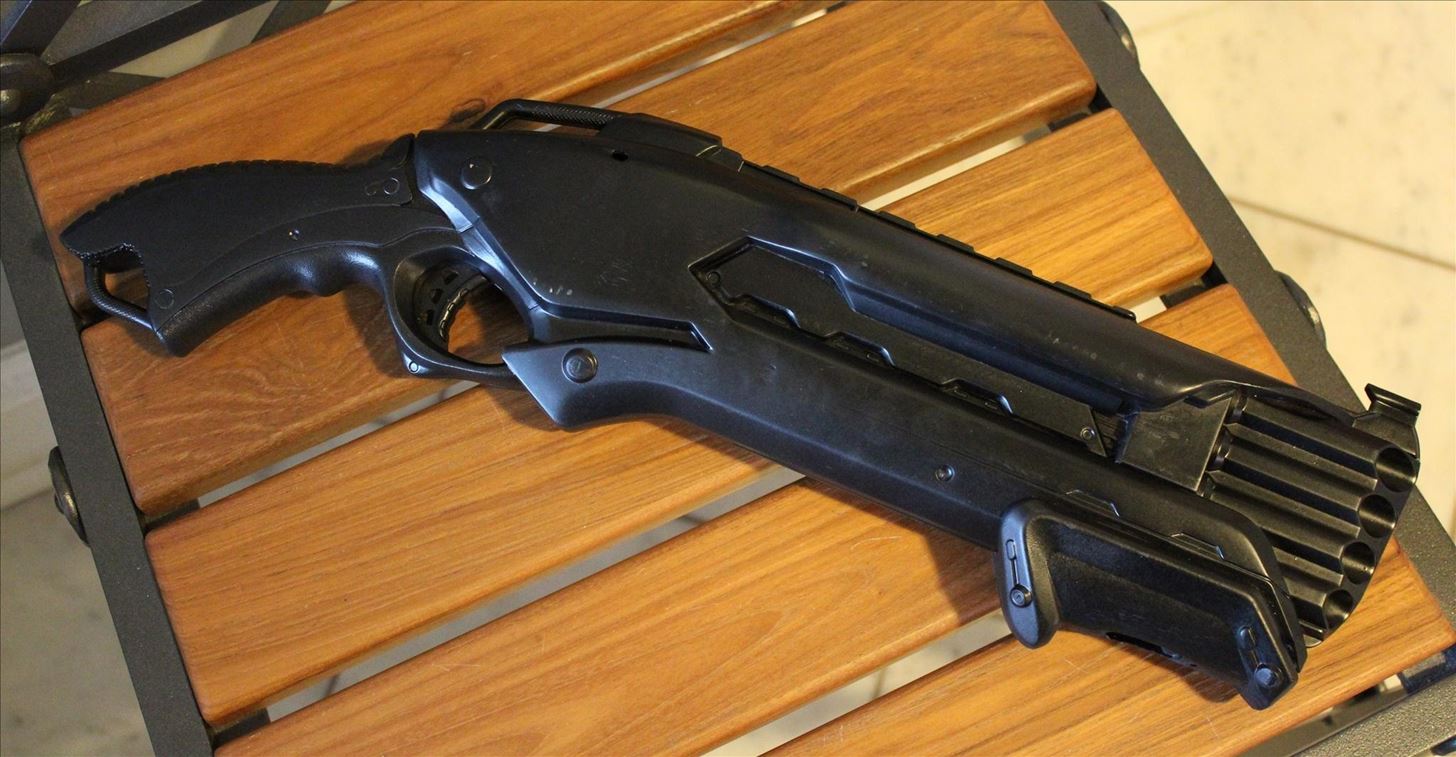
When I got mine, I went ahead and sanded off the Nerf logos and whatnot (like I did in with Nerf Dart Tag), and then painted it black. I highly recommend that you use black as a base color for anything you plan to use Rub 'n Buff on, as that way, if the wax wears off, or doesn't get into all the cracks, it just looks dirty or weathered.
So here's my painted and prepared Rough Cut:
Obviously you need to decide what colors you want to use on your prop, so I decided to use these four:
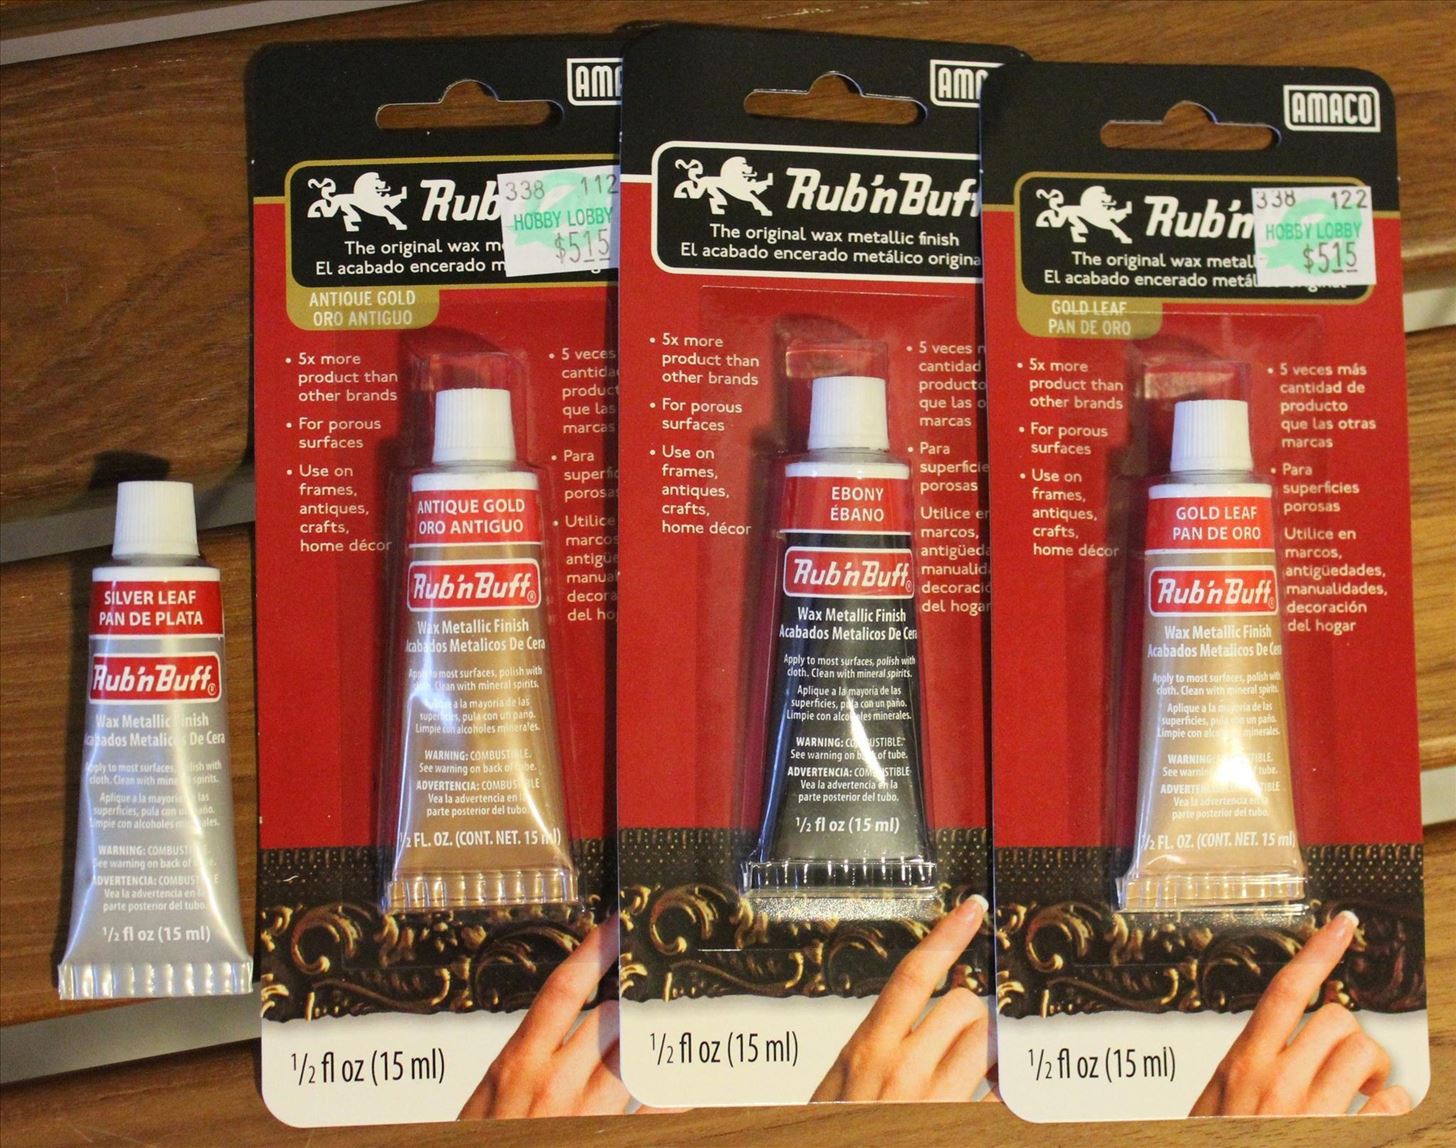
In case you can't read them, that's silver leaf, antique gold, ebony, and gold leaf. One thing to note before getting started is that sometimes Rub 'n Buff will separate into wax and oil, so if you open a tube and find that it's too watery, you may need to close it back up and massage the tube a bit until it mixes up.
Once you have a paste of suitable thickness, it's time to apply it to your prop. I recommend starting with any intricate areas first, as it will be hardest to do those later without getting Rub 'n Buff on the areas you've already done. So I chose to do the inset parts of the gun.
As far as application goes, I find that it's best to just start with your finger, and do any detail work with a Q-tip, or something similar. Below, you can see my very dirty finger. If you don't like getting your hands dirty, this may not be the style for you.
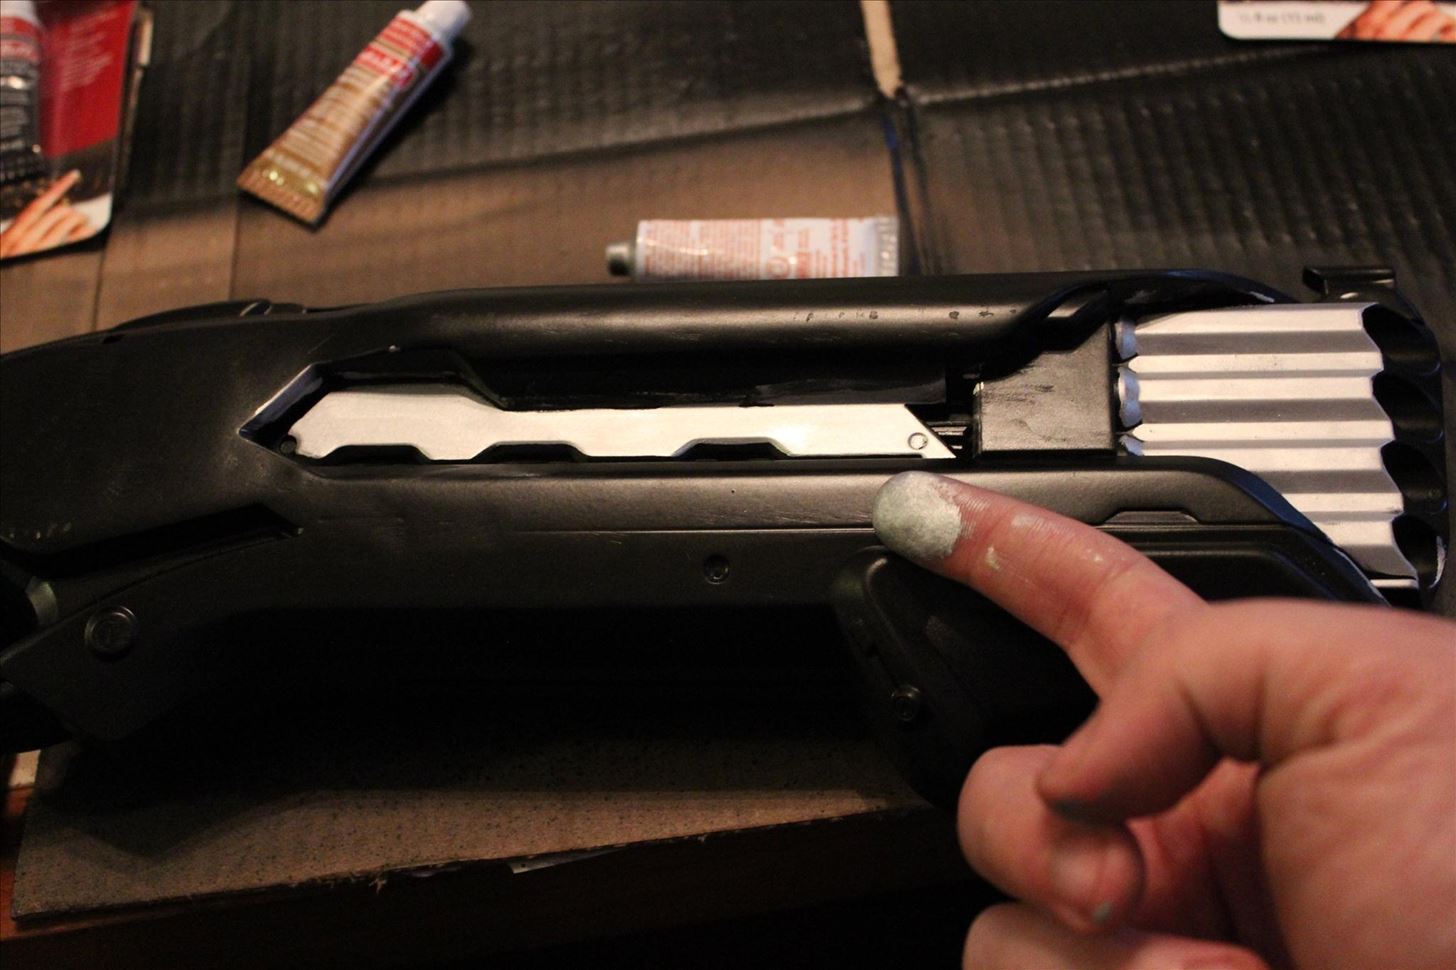
But what I do is to just put a tiny, tiny bit on my finger, and then apply it from there onto the gun. Use a rubbing motion, because you want to spread the paste out as thinly and as evenly as possible. The less you apply at a time, the better it will look, so try to refrain from just dumping a bunch onto your prop and rubbing it around. I'll admit that my patience was wearing thin, and I used a little too much from time to time, so you'll be able to see some mottling in my finished product.
Once you have the general motion down, all you have to do is just rub it all over the prop with your finger. Because it's wax-based, I didn't have any trouble cleaning my finger afterward with just soap and water.
If I had to estimate, I'd say that this took me under an hour.
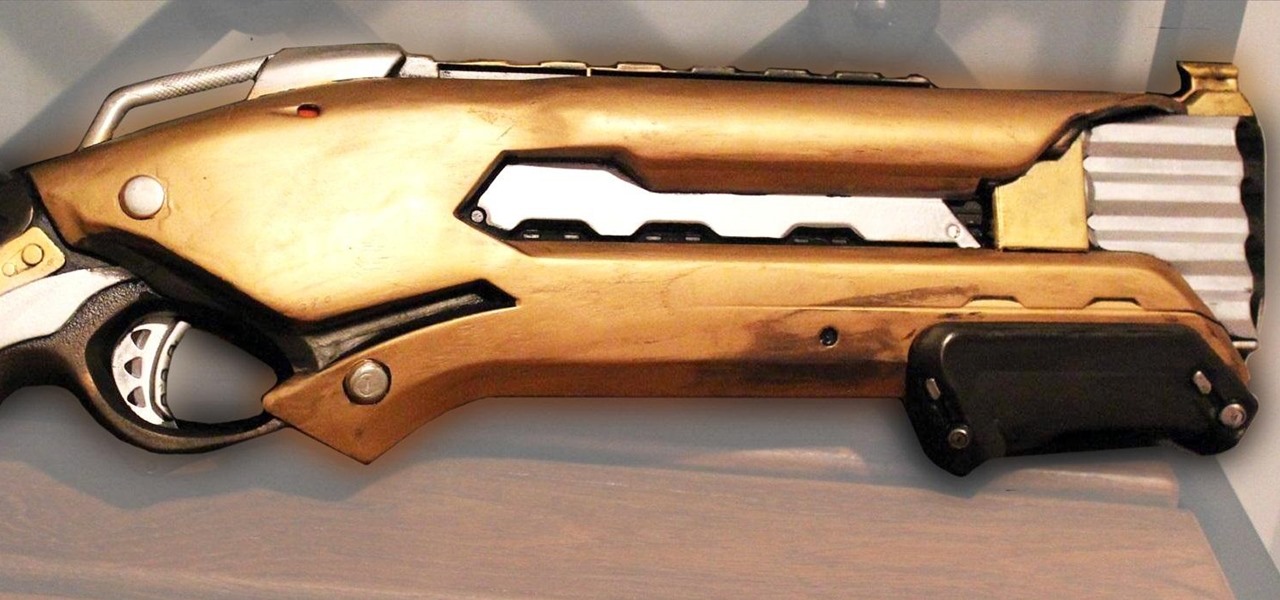
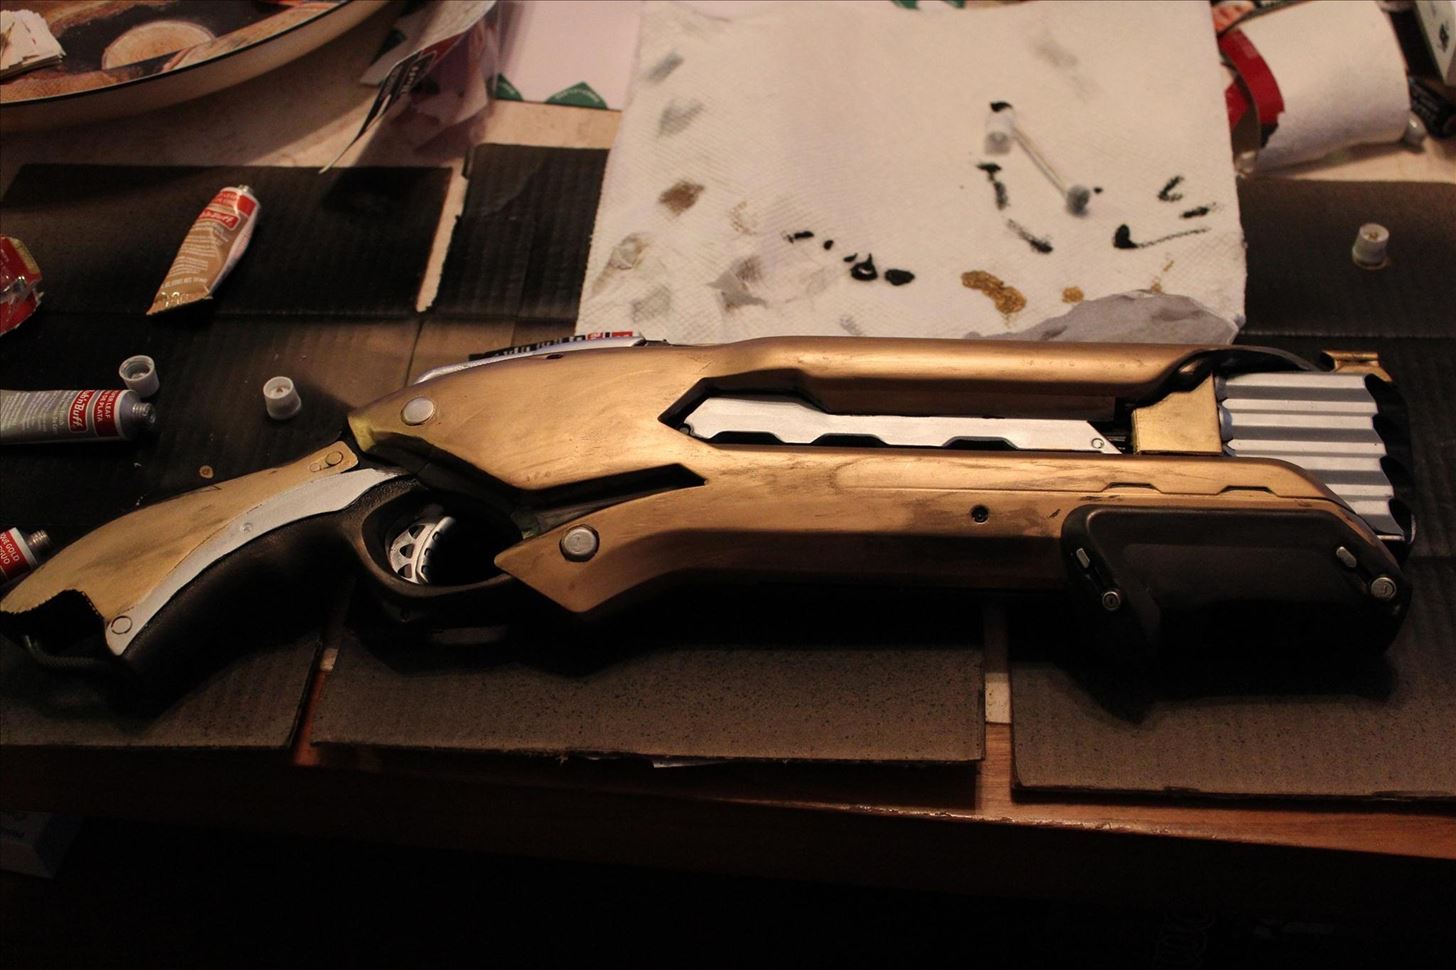
Here's a close-up where you can see that I applied too much at a time. Rather than getting a smooth, shiny sheen, you get streaks:
I mean, it still looks pretty good, I think, but you can see the streaks I'm talking about.
After you've finished applying your Rub 'n Buff, what you need to do is to take a soft cloth and buff it. Buffing is basically just rubbing vigorously back and forth, to bring out the shine. You don't want to push against the prop too hard, as you can move the wax around and create holes in the finish, but you still want solid pressure on it.
Once you have a good shine, you're done!
Some Notes on Usage:
Here are a few things to be aware of.
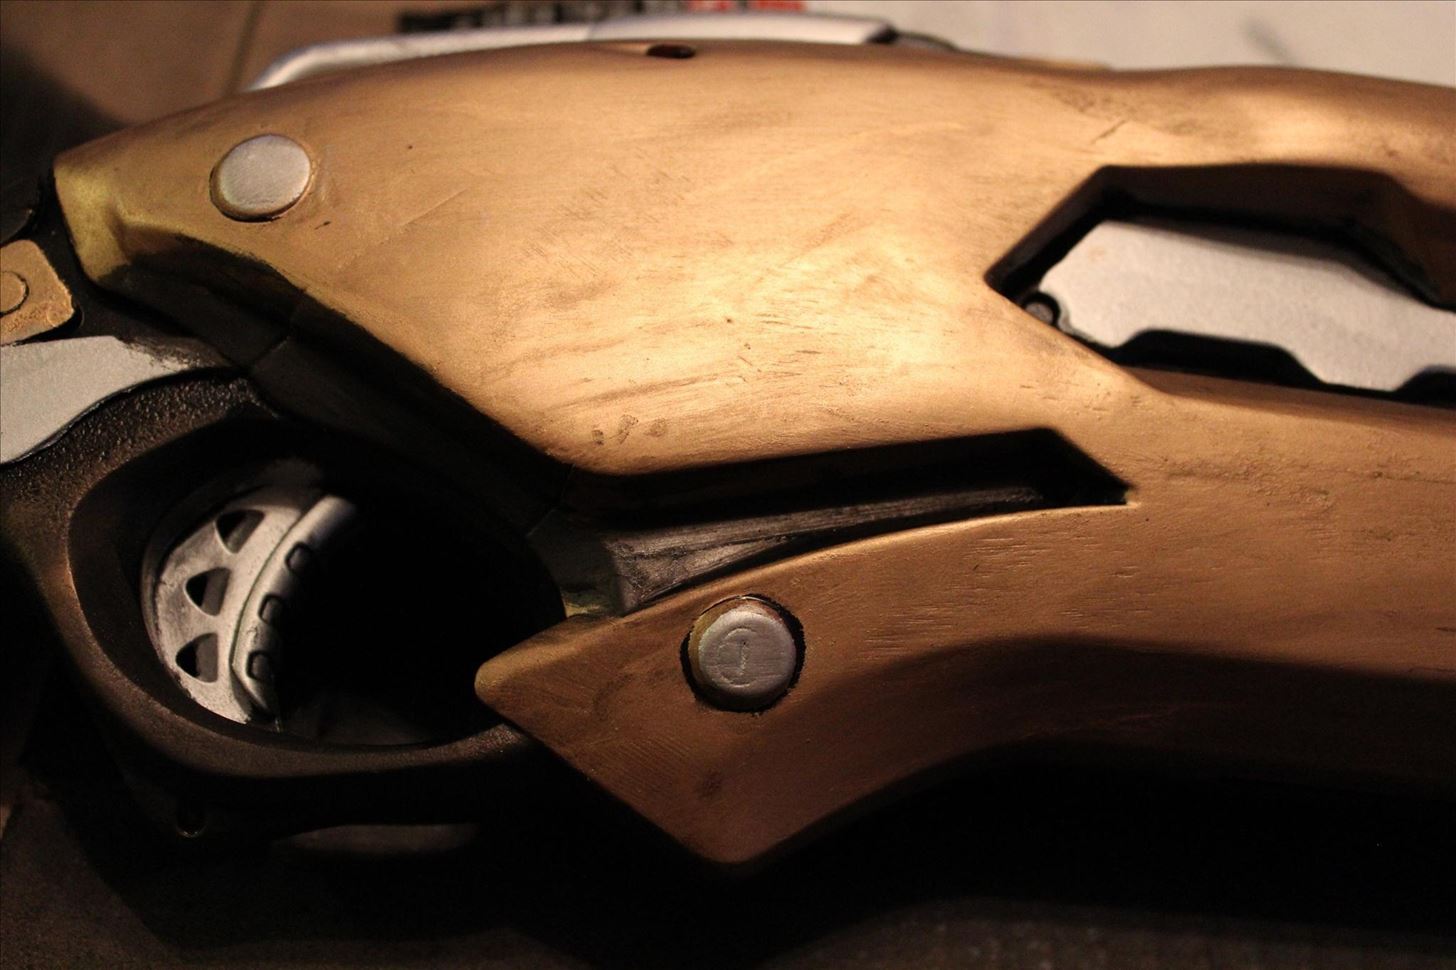
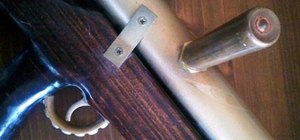
- Due to its waxy consistency and rubbing application, Rub 'n Buff is really hard to do any detail work with. The exception is raised areas, which provide natural boundaries, such as the two silver screws near the trigger in the photo above.
- If you get Rub 'n Buff on an area you don't want it on, don't worry! You can take it off with acetone if you want, but alternately, you can just apply a different color of Rub 'n Buff right over it! That's why it's easier to start with the intricate bits.
- DO NOT USE A SEALANT. There might be special Rub 'n Buff sealants out there, but if so, I don't know them. Any regular sealant products will dry out the wax and ruin the finish.
- Since you can't seal Rub 'n Buff, it's best to avoid using it places that will be near your skin, as the heat from your body over the course of a day may cause it to soften. It's fine if you're only using it for short periods, but for example, I used it on the grip of the gun above. Totally fine if the gun will spend most of it's time in a holster, but if I plan to carry in my hand, that might have been a bad design decision.
- In place of a sealant, what will usually work just fine is buffing it pretty hard right after you apply it, and then leaving it alone for a week or two. After that time, the wax will have dried and hardened, making it safe to handle, or rub against things, or whatever. Just be careful about heat, and you should be okay!
- If your Rub 'n Buff dries out and gets too hard, or starts flaking, I have it on good authority that using a little WD-40 on it will bring it back to life. I haven't used that technique myself, but I got that tidbit from a good source!
Nerf Rough Cut photo from UK Nerf.
Just updated your iPhone? You'll find new emoji, enhanced security, podcast transcripts, Apple Cash virtual numbers, and other useful features. There are even new additions hidden within Safari. Find out what's new and changed on your iPhone with the iOS 17.4 update.


28 Comments
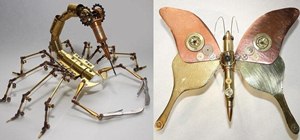
I rarely use metallic waxes for covering large areas. I use them most frequently for highlighting textures and edges. This really makes the features pop and adds a weathered look at the same time. This is the technique also used on ornate picture frames. See below and notice the features that would disappear if all one color.
Yeah, one of the reasons I love Rub 'n Buff so much is because of how versatile it is!
What an amazing method! I love it!
If you decide to use it, please share your creations with us!
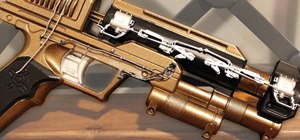
I used a similar method to Stephen's on the front of the disruptor. I have found that you can do some nice detail work with a decent, fine point paint brush as well. I did the brush work on all the the joints that look like welds.
Hmm, a paint brush? Does that go on smoothly enough to make it look like metal?
You need to wipe the brush often so it doesn't clump and use a small amount. I will wipe the brush on a piece of paper a few times before I actually apply it to the project, pretty much dry brushing it on. It's a little slow but I have had good results. You can see the joint work a little better on this piece.
Huh, alright. I'll give it a try, then.
Thanks for sharing! =)
That looks amazing. Where did you get the plasma ball and how is it being powered? I want to do something similar but with the Nerf Firefly.
Another great post. How did i not know of this product? And the other responders made fantastic suggestions as well. Thanks chaps.
Yeah, Rub 'n Buff is one of the best-kept secrets in Steampunk. No one seems to talk about it, but many of the best crafters rely on it heavily.
Give it a try!
Been working on another project and thought this would be a better example of the rub n ruff with a paint brush. These are bike locks, cut apart and spray painted black, then dry brushed with gold leaf.
Huh, thanks for sharing, Timothy. Cool technique!
Is there a 'best' finish to use with the spray paint, matte v. high gloss, or satin?
You mean for the black undercoat? I wouldn't finish it, personally, since you'll be covering it with rub n' buff.
If you just mean what kind of spray paint to use, I'd personally recommend a matte, which is what I used in this tutorial. However, it's entirely dependent on what you'll be using it for! If you want a more glossy or satin look where the rub n' buff is missing, then those are totally fine to use. =)
It really is personal preference. Play around and see what you like. I prefer the gloss finish when I age everything.
Thanks for the input, I may have messed it up any way because of the base material. It should look ok though. -Welding goggles for a Dr. Horrible Cosplay.
Oh, I've found that some goggles just won't hold spray paint because of the material. So what you'll need to use for the base coat is a bonds-to-plastic type of spray paint. I believe that Krylon has a good variety!
So you may find that it works better when you use the right paint. =)
I'm just getting into Steampunk and these tip are great. I picked up a couple cheap Nerf squirt guns to practice on. Can't wait to get started!! Awesome work everyone!! :-)
so im thinking of steampunking my nerf zombie hammer strike...but worried if i spray paint on a primer coat it will mess up the revolver action. any thoughts or tips?
Disassemble the gun first. I'm working on a pair Hammershots right now. The intricacies of the gun demand disassembly to maintain working integrity.
According to the manufacturer, you can seal Rub n Buff with Varathane.
Thank you! Thank you! Thank you! for this post. I have been trying to get that look and have been going nut trying to figure out how everyone does it! I love that it comes in so many finishes too since I am really more partial to the silver/nickle look than gold. I do go gold and copper sometimes but silver is definitely my go to color. I put the Rub n' Buff on my shopping list as soon as read the name and I am so excited to try this now. I have this cute little bulbous water gun that came with candy in a tube on top that just screams steampunk that I have been dying to do!
Thanks for sharing this wonderful method for making a steampunk weapon .
Is the first coat of paint necessary to allow the rub and buff to stay on?
Question? Has anyone tried the Rub 'N Buff on anything larger...maybe a trunk? I have an old trunk that I'd like to refurb for my nieces bedroom. Thought this might be a good idea.
Great tutorial! I was wondering about the application, if there was an easier way to do it than what I've been doing (tiny paintbrush). I'll just add that if you want to be able to add a sealant, you can use DecoArts' metallic wax as well. It's the consistency of Halloween face makeup and goes on really well...also a little goes a LONG way with the stuff. And there's a sealant of the same brand that's specifically made for use over the wax. There are different finishes but I like the satin-touch finish, keeps everything smooth and doesn't add unnecessary matting OR glossing.
Without a sealant, the Rub N Buff finish won't last long. When I first noticed the problems using spray sealants, I called the manufacturer of Rub N Buff, AMACO, and they told me to use AMACO All Purpose Sealer, which you can buy from their web site. It is a brush on sealant that works great, and preserves the metallic sheen.
Share Your Thoughts